How we ship Setcon software
A practical walkthrough of our Git Flow process — the same on every Setcon repository, from the controller HMI to the cloud EMS platform. From your first pull on Monday morning to tagging a release. New to collaborative dev? Start at the top and follow it through.
The big picture
Three layers of branches. Everyone agrees on which layer their work belongs in.
dev. Periodically
dev is promoted to main with a tag.
dev. Tagged per version.dev, merge back into dev via PR.Why this way?
Our software runs in places where breakage is expensive — on
customer controllers in the field, on cloud EMS servers that customers
depend on, on industrial panels that are hard to reach. We can't just
push to a single line and hope. We need an integration playground
separate from what's deployed to production. Hence two protected
lines: main for what's running, dev for what's
next.
The model applies whether you're working on:
- Controller code — the CODESYS / Node.js firmware that runs on customer-deployed energy controllers
- Cloud platforms — the EMS, monitoring, or customer-facing services hosted on Setcon servers
- Internal tools — commissioning utilities, diagnostic tools, brand assets, anything else under version control
You're not "pushing code to the project." You're proposing changes via PRs. Code only becomes real once a teammate has reviewed it and CI has confirmed it works. This is the safety net that makes shipping to production survivable — whether production is a remote controller or a cloud server.
Before you start
One-time setup. Each row links to a detailed guide in the Setup guides section below.
| What | Why | Setup |
|---|---|---|
| GitHub account | So you can be added to the setcon-za org and own your PRs. |
Create account → |
| Org membership | Without it, you can't see the repo. Ask the project lead. | Get invited → |
| Git + Git Bash | The command-line client that talks to GitHub. Git Bash gives you a Unix-style terminal on Windows. | Install Git → |
| Git identity | Stamps your name + email on each commit so reviewers know who did what. | Configure → |
| GitHub auth (PAT) | A personal access token so Git can push on your behalf. Stored once via Credential Manager. | Set up auth → |
| Node.js 20+ | Required to run the HMI locally and let CI mirror your machine. | Install Node → |
| Clone the repo | Brings the project onto your local disk so you can work on it. | Clone → |
| Claude Code | Your AI pair-programmer. Reads project context from CLAUDE.md and helps you build. |
Install Claude → |
About 45 minutes for a clean machine. Most of it is waiting on installers. Do it once and you're set.
First-time setup
The actual sequence we walk new teammates through — sitting next to them at their machine. Each step has a checkpoint; pause and verify before moving on.
Commands shown in PowerShell (Windows default). They
all work in Git Bash too, with slightly different path syntax
(/c/Users/<you> instead of C:\Users\<you>).
-
Pre-flight: what's already installed?
Open PowerShell (Win + R → type
powershell→ Enter):git --version # expect git version 2.x node --version # expect v20.x or laterIf either says "not recognized", install it before going further:
- Git: git-scm.com/download/win — see Install Git + Git Bash for recommended options
- Node.js: nodejs.org — pick the LTS download
Re-run the checks above before continuing.
-
Configure your git identity
So every commit you make is stamped with your name and links to your GitHub profile:
git config --global user.name "Your Full Name"
git config --global user.email "your-github-email@example.com"
Use the email associated with your GitHub account. Verify:
git config --global --listShould show
user.name=...anduser.email=...among the output. -
Generate a Personal Access Token (PAT)
GitHub's password replacement for command-line operations. Created once, stored by Windows Credential Manager after first use.
- Sign in to GitHub in any browser
- Visit github.com/settings/tokens → Personal access tokens (classic) → Generate new token (classic)
- Fill in:
- Note:
setcon-<your-laptop> - Expiration: 90 days
- Scopes: tick
repo(full control of private repos)
- Note:
- Click Generate token → copy it immediately (GitHub only shows it once)
- Paste it somewhere temporary (Notepad is fine) until step 4 below
If you lose the tokenDon't panic — just regenerate. The old one is invalidated automatically. Tokens are disposable.
-
Pick a projects folder and clone the repo
Decide where you'll keep Setcon projects. Common choice:
C:\Users\<you>\projects\.# Create the folder if it doesn't exist mkdir C:\Users\<you>\projects -Force cd C:\Users\<you>\projects # Clone (replace <repo> with the actual repo name) git clone https://github.com/setcon-za/<repo>.git cd <repo> git checkout devThe clone triggers an authentication prompt — a Windows dialog pops up. Pick the Token option, enter your GitHub username, paste the PAT as the password. Credential Manager remembers it after that.
Verify:
git status # expect "On branch dev" git log --oneline -5 # expect a list of recent commits -
Install dependencies
npm installPulls down
node_modulesfor every workspace. Takes 1–2 minutes. Expect output like "added 200+ packages, 0 vulnerabilities". -
Smoke-test by running the project
Each repo has its own dev / build commands. For the controller HMI:
npm run dev -w packages/frontendVite starts and prints
Local: http://localhost:5173/. Open that URL in your browser — you should see the HMI render with the dark theme. If yes, your environment is fully working.Press Ctrl+C in PowerShell to stop the server.
Port already in use?If 5173 is busy (someone else on the same machine, or a previous session that didn't exit cleanly), Vite automatically picks 5174. That's normal — just visit the URL it prints.
-
Open the workflow guide
In File Explorer, navigate to your cloned repo →
docs\workflow-guide.html→ double-click. Opens in your default browser.Skim the Daily workflow section — that's the loop you'll run for every change going forward.
-
Your "Hello PR"
The single best way to internalise the workflow: do it once with a tiny, real change. Suggestions:
- Fix a typo you spot in any doc
- Add your name to a
CONTRIBUTORS.md - Tighten an unclear comment in code you read
Then follow the standard PR loop:
git checkout dev
git pull
git checkout -b fix/<short-description>
# make your change in an editor, save
git add <the-file>
git commit -m "fix: <short-description>"
git push -u origin fix/<short-description>
Open the PR via the URL git prints. A teammate reviews + approves. You squash-merge + delete the branch. Pull dev locally.
You're now a contributor. From here, every change follows that same loop.
Steps 4–7 above apply to each repo you'll work on (controller, EMS platform, etc). Clone the repo, install dependencies, smoke-test. Your git identity + PAT from steps 2–3 are global and don't need to be redone.
Daily workflow
The loop you'll repeat hundreds of times. Five moves.
-
Sync with the latest dev
Pulls down anything teammates have merged since you last worked.
# Morning ritual — never skip this
git checkout dev
git pull
Why: branching off a stale
devmeans you'll probably hit merge conflicts later. 30 seconds now saves 30 minutes on Friday afternoon. -
Branch off dev with a descriptive name
Pick a prefix matching the kind of change you're making.
Prefix When Example feature/New functionality feature/dispatch-optimisation fix/Bug fix fix/login-redirect-loop refactor/Restructure, no behaviour change refactor/extract-shared-charts chore/Tooling, deps, config chore/upgrade-vite-7 docs/Documentation only docs/add-onboarding-guide git checkout -b feature/<your-topic>Your terminal prompt should change to show the new branch in parentheses.
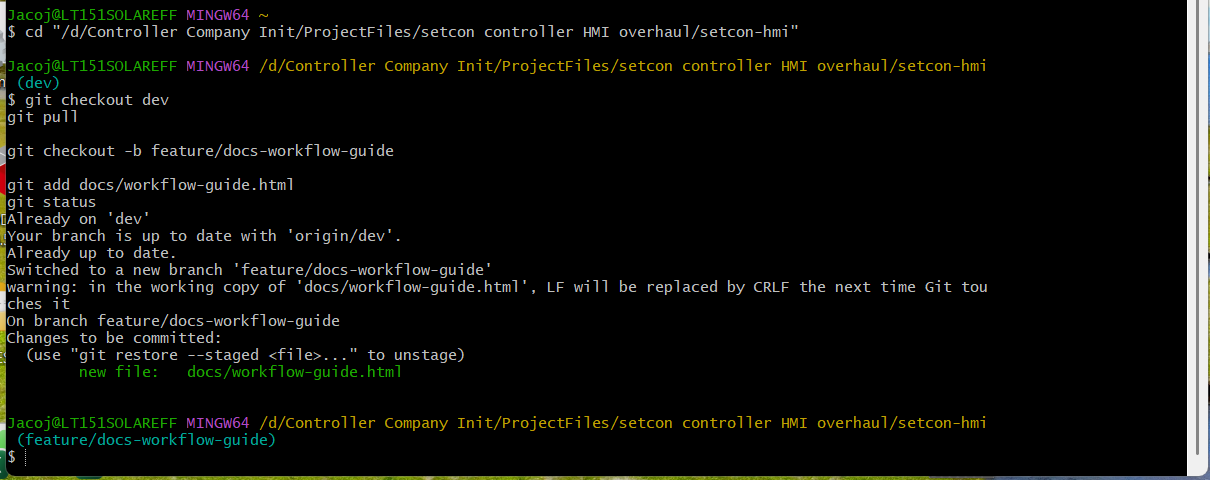 FIG 1Real terminal: sync dev, branch off, stage a new file
 -
Code, commit, push — small chunks
Commit every time you finish a coherent slice of work. Don't wait until the whole feature is done. One concept per commit.
# Stage just the files you intend to commit
git add path/to/changed-file.ts

# Commit with a conventional message
git commit -m "feat: Add <short description of what this adds>"

# First push needs -u to set up tracking; after that just `git push`
git push -u origin feature/<your-topic>
Conventional commitsSubject ≤ 70 chars. Start with one of:
feat:,fix:,chore:,refactor:,docs:,ci:,test:,perf:. Imperative mood ("Add", not "Added"). Body explains why, not what.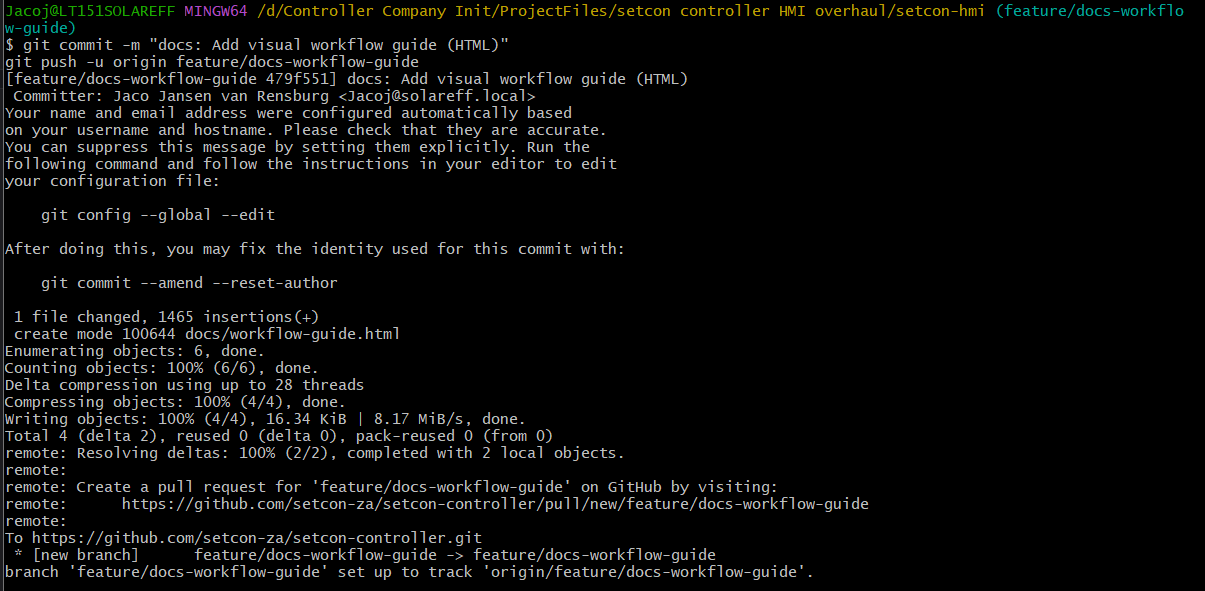 FIG 2After push: GitHub prints the PR creation URL you click next
 -
Open a PR targeting dev
Once your feature is in a reviewable state, push your final commits and open the pull request. The push output prints a URL — click it.
git push
# → https://github.com/setcon-za/<repo>/pull/new/feature/<your-topic>
On the PR form, confirm base =
devand fill in:- Title: same conventional format (e.g.
feat: Add <short description>) - What changed — 1–2 sentences
- Why — the user-facing reason
- How to verify — steps to test locally
- Screenshots for any UI change
Click Create pull request.
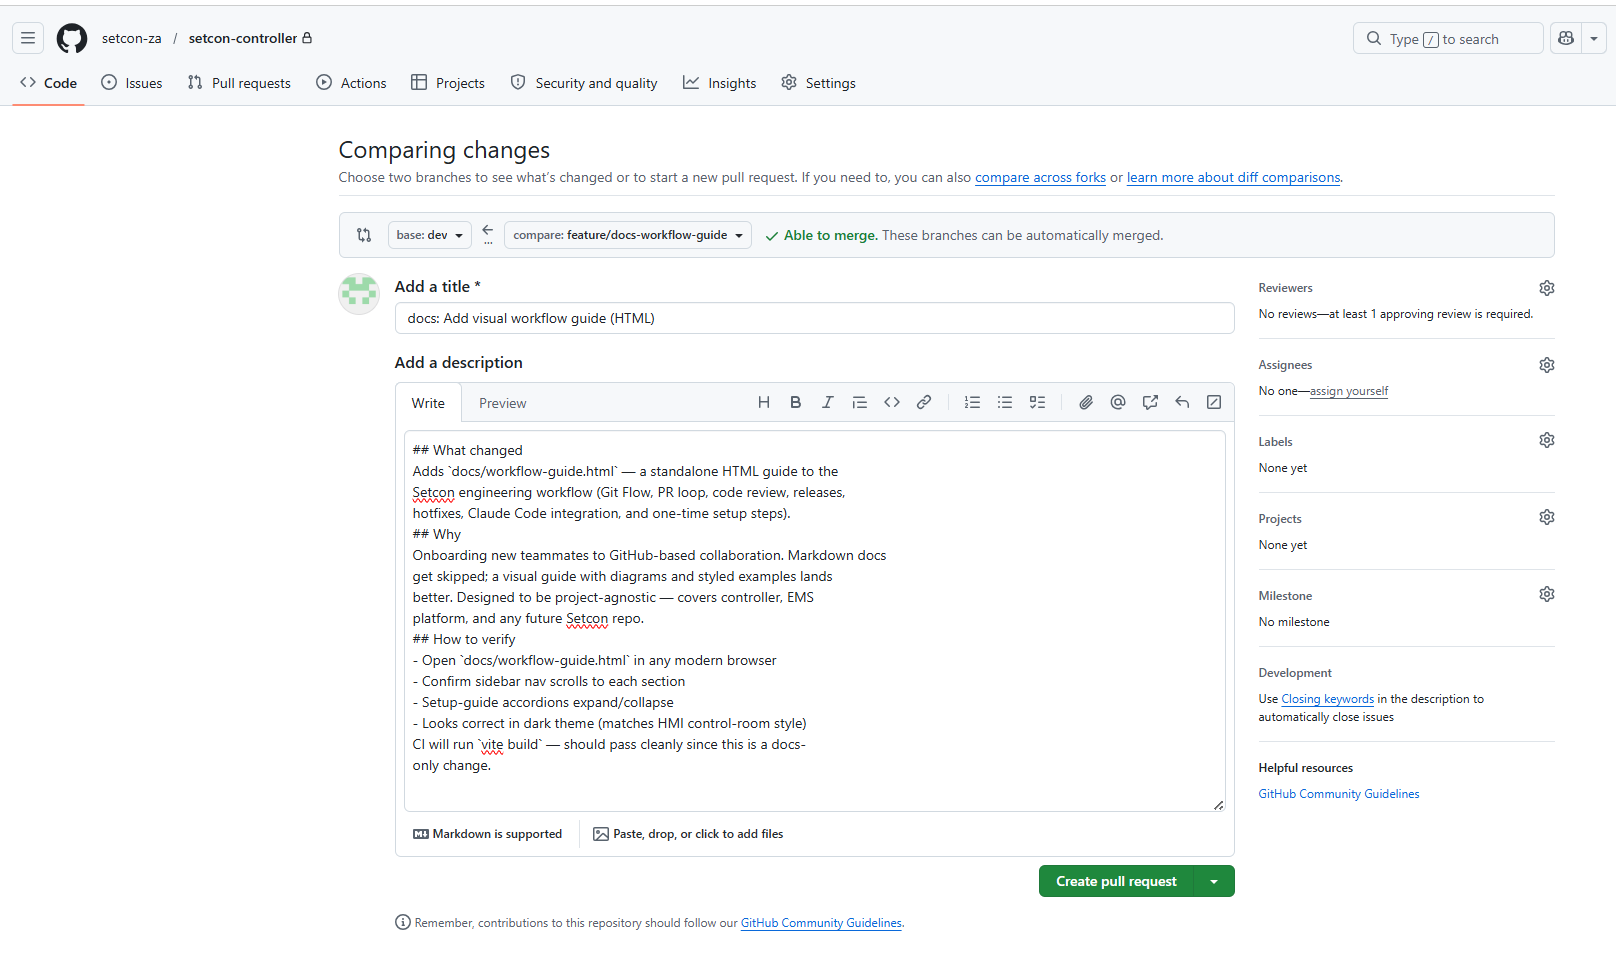 FIG 3The PR creation form — confirm base = dev before clicking create
 - Title: same conventional format (e.g.
-
Wait for CI + review, address feedback, merge
Within ~30 seconds, the project's CI checks kick off (typically a build + tests; each repo defines its own in
.github/workflows/). While they run, a teammate picks up the review.- CI running Yellow dot — build / tests in progress
- CI passed Green check — all checks satisfied
- CI failed Red x — fix the issue, push again, CI re-runs
The merge box on the PR is your status dashboard. Here's what it looks like right after the PR opens — review block, CI still queued, the merge button greyed out:
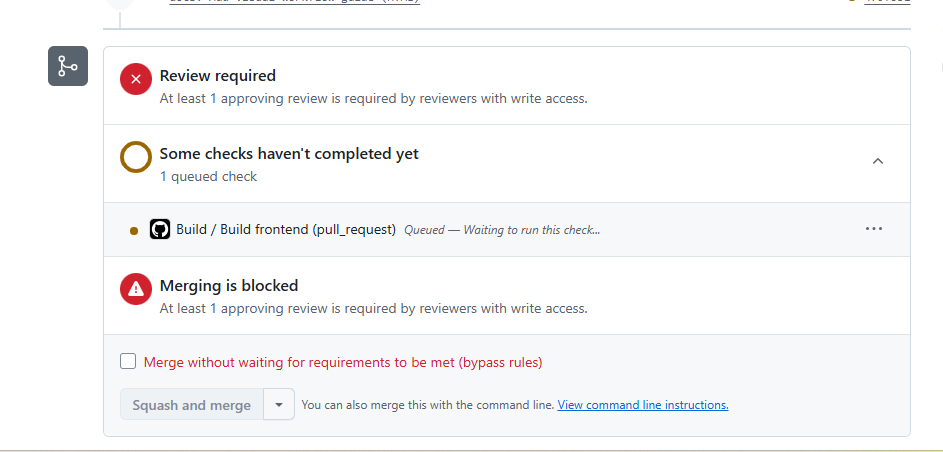 FIG 4Composite status: review block + CI queued + merge greyed out
~17 seconds later the build finishes. The CI section turns green but the review requirement still blocks — protection working exactly as designed:
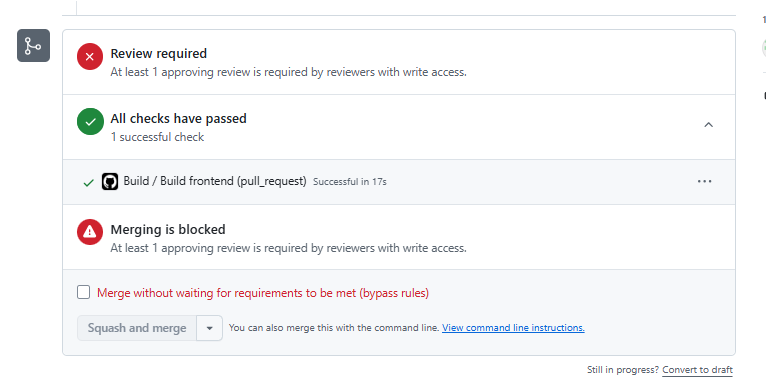 FIG 5CI green ≠ merge unlocked. Review requirement still blocks.
Once you have an approval (or, while working solo, you tick the bypass option), the squash-merge button activates. Confirm the squash message and merge. GitHub immediately shows the merged state:
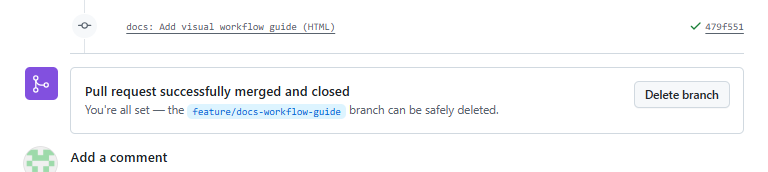 FIG 6Merged. Click Delete branch to clean up the remote.
Then locally:
git checkout dev
git pull
git branch -D feature/<your-topic>
Your
devfast-forwards to the squashed merge commit, and your local feature branch is gone. The new commit is visible at the top ofgit logalongside every other merged PR: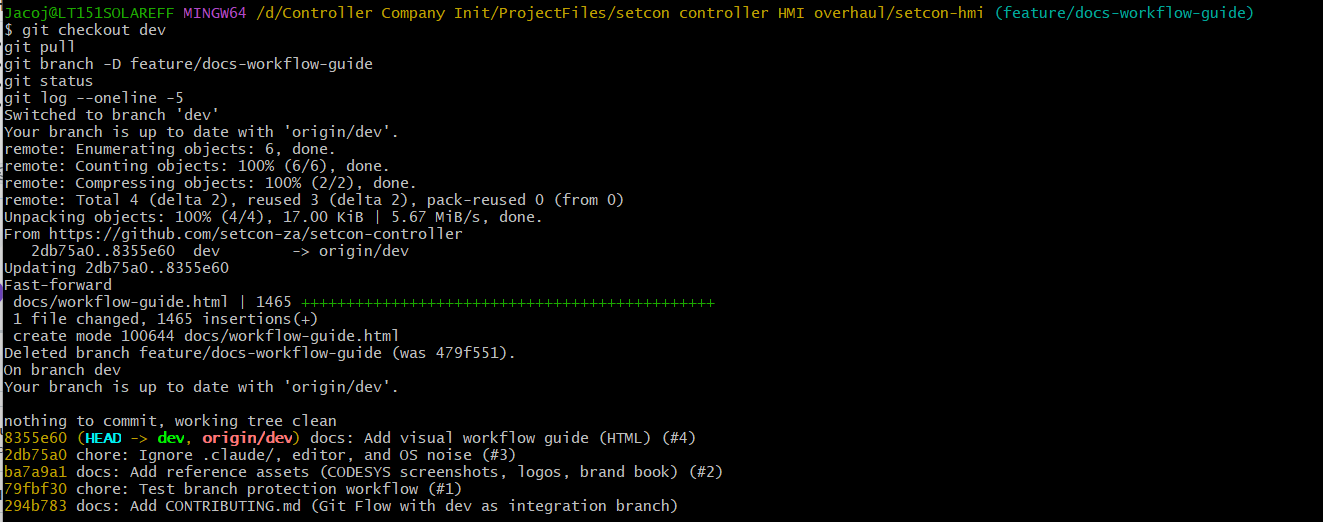 FIG 7Back on a clean dev. The history reads like a changelog.
You're back at the start of the loop. Time for the next task.
Code review
The single most important part of a team workflow. Two angles — the author and the reviewer.
- Keep PRs < 400 lines
- Write a clear description with screenshots
- Self-review your diff before requesting review
- Respond to comments as new commits — don't force-push
- Does the code do what the description says?
- Does it follow this project's conventions (
CLAUDE.md+docs/)? - Are types / inputs tight? No unjustified
any/ unchecked inputs? - Did any affected docs stay accurate?
- For UI changes: does it work at the target form factor (panel / desktop / mobile)?
How to leave a review on GitHub
- Open the PR → Files changed tab
- Hover the gutter on any line → click the + icon → leave a comment
- For "change this to that" feedback, use a suggestion block (the ± icon) — the author can apply it with one click
- When done, click Review changes at the top right
- Choose: Approve, Comment (questions only, no block), or Request changes (block until addressed)
Aim to review within 24 hours. If a PR sits open longer than that, merge conflicts pile up and momentum dies. If you can't review fully, leave a quick comment so the author knows you've seen it.
Merge conflicts
What happens when two PRs touch the same lines. Sounds scary the first time. It's fine.
The scenario
You and a teammate both edited the same file on different branches. They merged first. Your PR now shows a red banner: "This branch has conflicts that must be resolved."
Resolving locally
# 1. Switch to your branch and pull the latest dev into it
git checkout feature/your-thing
git fetch origin
git merge origin/dev

# 2. Git tells you which files conflict — open them in your editor
#    You'll see <<<<<<< HEAD ... ======= ... >>>>>>> origin/dev
#    markers around the conflicting regions.

# 3. Edit each conflict to keep the correct final code. Delete the markers.

# 4. Stage the resolved files and finish the merge
git add path/to/resolved-file
git commit -m "chore: Resolve merge with dev"

# 5. Push — the PR auto-updates and CI re-runs
git pushIf your feature branch lives for more than a day or two, periodically
pull dev into it (steps 1–2 above) before conflicts pile
up. Resolving one day of drift is easy. A week of drift is painful.
Working with Claude Code
Claude Code is an AI pair-programmer that lives in your terminal. It reads the repo, edits files, runs builds, and commits — like another developer on your team.
The rules of engagement
- Open Claude Code from your
feature/<topic>branch. Claude commits to whatever branch you're on. Never run it fromdevormaindirectly. - Claude reads
CLAUDE.mdautomatically. That file is the project-wide context — domain glossary, file map, conventions. Keep it accurate. - Review every diff before pushing. Claude is fast
and usually right, but it doesn't know everything.
git diffbeforegit pushis your safety net. - If Claude proposes something against convention, push back. The convention wins. Tell Claude what's wrong and ask it to retry.
Good things to ask Claude for
Each developer runs their own Claude session on their own feature branch. They never collide because each branch is isolated until PR time. The review + CI pipeline catches anything Claude got wrong on any branch.
Releases
The rare moment when dev gets promoted to main and
a customer-deployable version is born.
When to release
- A logical group of features is complete on
dev - Integration testing passed
- A customer deployment is planned (or you want a clean checkpoint)
The release process
-
Confirm dev is shippable
Pull the latest dev, run a clean build, do a smoke test of the project locally.
git checkout dev git pull # Then run the project's build + local smoke test # (each repo has its own commands — see its README) -
Open the release PR: dev → main
On GitHub, set base =
main, compare =dev. Title:Release v0.4 — <theme>. Description is the changelog — group commits byfeat:,fix:,refactor:, etc. -
Get approval + merge
Use Merge commit here, not Squash — preserves the dev history on main so an engineer can later trace which feature PR added what.
-
Tag the merge commit
git checkout main
git pull
git tag -a v0.4-<theme> -m "Release v0.4 — short summary"
git push --tags
On GitHub: Releases → Draft a new release → pick the tag → write release notes → publish.
-
Deploy the tag to production
Deploy the tagged version to whatever production target this repo serves — customer controller hardware, cloud server, internal panel, etc. The tag name is your reference point: if a bug is reported later, check out that tag to reproduce the exact deployed state.
Hotfixes (the rare exception)
Production (a customer controller, a cloud service, etc.) is on
v0.4 and a critical bug surfaces. You can't wait for the
next normal release cycle. Branch off main, fix, ship,
then back-port to dev.
main, lands back on main + dev.# 1. Branch off main (NOT dev)
git checkout main
git pull
git checkout -b hotfix/<short-description>
# 2. Fix the bug, commit
git commit -m "fix: <what the fix does>"
# 3. Push and open a PR targeting main (not dev)
git push -u origin hotfix/<short-description>After the PR merges to main:
- Tag the new release (e.g.
v0.4.1) - Also open a PR merging
mainback intodevso the fix doesn't get lost whendevnext releases - Deploy
v0.4.1to the affected customer
If the bug isn't actively burning a customer, just fix it as a
normal fix/ branch off dev and let it ride the
next release. Hotfixes bypass the integration testing on dev;
only worth that risk for genuine emergencies.
Setup guides
One-time setup steps, each as a collapsible block. Work through them in order on a new machine.
Create a GitHub account
- Go to github.com/signup
- Use your Setcon work email if you have one — easier to manage org membership
- Pick a username that's recognisable to teammates (your real name or a clear handle)
- Enable 2-factor authentication — this is required for any org with a security policy, and we'll enforce it on
setcon-za
Get added to the setcon-za GitHub org
Ask the project lead (currently Jaco) to invite you:
- Send them your GitHub username
- They'll go to setcon-za org → People → Invite member
- You'll receive an email with an invite link — click it and accept
- Once in the org, you'll be added to the repos relevant to your work (controller, EMS platform, etc.) with at least Write access
Visit github.com/setcon-za after accepting the invite. If a repo you expect to see is missing or returns 404, your access wasn't granted — ask the lead.
Install Git + Git Bash (Windows)
- Download from git-scm.com/download/win
- Run the installer. Recommended settings:
- Default editor: pick whatever you'll edit commit messages in (VS Code, Notepad++, vim)
- Branch name: "Override the default to
main" - PATH: "Git from the command line and 3rd-party software" (default)
- HTTPS: "Use the OpenSSL library" (default)
- Credential helper: "Git Credential Manager" — this is what lets you authenticate to GitHub without typing a password every push
- Everything else: defaults
- After install, open Git Bash (it's a new entry in your start menu)
- Verify:
git --versionshould print something likegit version 2.45.1.windows.1
Configure your Git identity
Stamps your name + email on every commit you make. Use the email associated with your GitHub account — that's what links commits to your GitHub profile.
git config --global user.name "Your Name"
git config --global user.email "you@example.com"
Verify with:
git config --global --listIf your first commit shows up under a placeholder like
Jacoj@solareff.local, you forgot this step. Set it now —
it'll apply to all future commits. (Old commits stay under the
old identity; not worth fixing unless they're public.)
Set up GitHub authentication (Personal Access Token)
For pushing to GitHub from the command line. Git Credential Manager (installed with Git for Windows) handles storing it — you only enter the token once.
- Go to github.com/settings/tokens → Personal access tokens (classic) → Generate new token
- Name it something like
setcon-laptop(one token per machine is the usual approach) - Expiration: 90 days (you'll re-generate periodically)
- Scopes: tick
repo(full control of private repos) - Click Generate token and copy the value (you only see it once)
- The next time you
git pusha Git Bash window will pop up asking for credentials — enter your GitHub username and paste the token as the password. Credential Manager remembers it.
If you prefer SSH over HTTPS+PAT, follow GitHub's SSH key setup guide — slightly more setup but no token expiry. For a brand-new developer, PAT is faster to get going.
Install Node.js 20+
- Download the LTS version from nodejs.org — currently Node 20 or 22 (either works)
- Run the installer with default options
- Open Git Bash and verify:
node --version   # should print v20.x.x or v22.x.x
npm --version    # should print 10.x.x
Clone a repository
Brings any Setcon project onto your local disk. Repeat for each
repo you'll work on (e.g. setcon-controller,
ems-platform, etc.).
- Open Git Bash.
cdto wherever you keep your projects:cd "/c/Users/you/projects" - Clone the repo (replace
<repo>with the actual repo name):git clone https://github.com/setcon-za/<repo>.git cd <repo> - The first
git clonetriggers the auth prompt — enter your GitHub username + the PAT you generated earlier - Switch to dev (the integration branch) before you start work:
git checkout dev - Follow the project's
README.mdfor project-specific install + run instructions (every Setcon repo has one at the root). Typical pattern for Node projects:npm install npm run dev
The cadence applies per-repo, not per-machine. Every new repo you join needs its own clone + dependency install.
Install Claude Code
Claude Code is a CLI that brings the Claude AI into your local dev loop. It reads your files, edits them, and commits to your branch.
- Sign up for an Anthropic account at console.anthropic.com
- Install Claude Code from docs.anthropic.com/en/docs/claude-code — follow the platform-specific install steps for Windows
- Authenticate when prompted (sign in via browser)
- Open Git Bash and
cdinto whichever Setcon repo you'll work in - Make sure you're on a feature branch (not
devormain):git checkout -b feature/my-first-task - Launch Claude Code:
claude - Claude will read
CLAUDE.mdautomatically and be ready for your first prompt
"Read CLAUDE.md and tell me back in 5 bullet points what this project does and what conventions you'll follow."
This verifies Claude is loading the project context correctly before you start asking for real changes.
(Optional) Install the GitHub CLI
Lets you open PRs from the terminal instead of clicking through the GitHub web UI. Convenient but not required.
- Install from cli.github.com
- Authenticate:
Pick GitHub.com → HTTPS → "Yes, authenticate Git" → "Login with web browser" and follow the prompts.gh auth login - Now you can do
gh pr create --base devto open a PR without leaving the terminal.
Abbreviations
A quick reference for all the abbreviations used in this guide — useful if you are reading this for the first time.
| Abbreviation | Stands for | What it means in context |
|---|---|---|
| PR | Pull Request | A proposed change submitted on GitHub for review before merging into a branch. |
| CI | Continuous Integration | Automated checks (build + tests) that run on every PR to catch problems early. |
| PAT | Personal Access Token | A GitHub-generated password replacement used to authenticate Git from the command line. |
| HMI | Human Machine Interface | The on-site operator screen on a Setcon controller — what the customer sees and touches. |
| EMS | Energy Management System | The Setcon cloud platform for monitoring and controlling energy assets remotely. |
| LTS | Long Term Support | A stable, long-supported release of software (e.g. Node.js LTS). Recommended over cutting-edge versions for reliability. |
| CLI | Command-Line Interface | A text-based terminal tool — Git, npm, and Claude Code are all CLI tools. |
| HTTPS | HyperText Transfer Protocol Secure | The secure web protocol used to connect to GitHub. Used when cloning with a PAT. |
| SSH | Secure Shell | An alternative to HTTPS for authenticating to GitHub using a cryptographic key pair. |
| 2FA | Two-Factor Authentication | A login security method requiring a second form of verification (e.g. an app code) in addition to your password. |
| npm | Node Package Manager | The tool used to install JavaScript dependencies for a project (npm install, npm run dev). |
| AI | Artificial Intelligence | Refers to Claude Code — the AI pair-programmer used in the Setcon workflow. |
| VS Code | Visual Studio Code | A popular free code editor by Microsoft. Recommended for editing files in Setcon projects. |
| URL | Uniform Resource Locator | A web address — e.g. the link GitHub prints after a push to create a PR. |
| WIP | Work In Progress | A branch or PR that is not yet ready for review. Prefix the PR title with [WIP] to signal this. |
Quick reference
Print this page or pin the section. The 10 commands that cover 95% of your day.
| What | Command |
|---|---|
| Sync dev | git checkout dev && git pull |
| Start a new task | git checkout -b feature/<topic> |
| Stage changes | git add <file> |
| Commit | git commit -m "feat: ..." |
| Push (first time on branch) | git push -u origin <branch> |
| Push (subsequent) | git push |
| See branch state | git status |
| See recent commits | git log --oneline -10 |
| Pull dev into your branch | git fetch && git merge origin/dev |
| Delete a merged branch locally | git branch -D <branch> |
Conventional commit prefixes
| feat: | A new feature |
| fix: | A bug fix |
| refactor: | Restructure without behaviour change |
| chore: | Tooling, deps, config |
| docs: | Documentation only |
| ci: | CI / GitHub Actions changes |
| test: | Tests added or updated |
| perf: | Performance improvement |
Where to look for help
Each Setcon repo follows the same convention — look in these files of whichever project you're in:
| Project context, domain glossary, conventions | CLAUDE.md |
| This workflow (full prose) | CONTRIBUTING.md |
| Project-specific design docs | docs/ |
| Visual / reference assets | reference/ |
| This guide (web version) | docs/workflow-guide.html |
If a doc you need isn't there, write it — that's a valid PR.